Introduction:
Microsoft Word is the most widely used application software for formatting text documents. The theme selection, colors, fonts, paragraph spacing, effects, watermark, and page background are essential for each document. In addition, these elements play a significant role in enhancing the document’s overall appearance. The theme selection, colors, fonts, paragraph spacing, effects, watermark, and page background are essential for each document. Design Tab in MS Word has it all.
To begin with, this article will describe the Design tab in detail, so that you’ll be able to edit documents professionally. You won’t need to go to any other source to learn it. We have added everything you may need when editing the design of documents. You could insert and edit watermarks, page colors, and borders after reading this guide completely. With that in mind, let’s get started.
Design Tab in MS Word:
Various tabs are accessible on Microsoft Word’s menu bar. Design Tab is one of them and it can be used to apply any theme and edit it according to your requirements. You can select any theme first, then change the style set that is currently being used, colors, fonts, and effects. The Design Tab allows you to customize the page color, add a watermark, set page borders, and many more. It includes the following sections:
Document Formatting: Use it to format themes, styles, colors, fonts, paragraph spacing, and effects.
Page Background: Use it to format the watermark, page color, and page background.

Documents Formatting:
In various documents, you need to use different types of themes, styles, colors, fonts, paragraph spacing, and effects. The document Formatting section of the Design Tab in MS Word has it all. Has it all. You can select any theme from already available themes. Meanwhile, online themes can also be used. Also, you have the option to edit it further. For instance, you can change style sets, colors, and fonts to make it perfect for your requirements. This section contains the following dropdowns:
Themes
Click on the theme dropdown, many themes will be already given. These themes are “Office, Facet, Gallery, Integral, Ion, Ion Board, Organic, Retrospect, Slice, Wisp, Banded, Basis, Berlin, Celestial, Circuit, Damask, Depth, Dividend, Droplet, Frame, Gallery, Main Event, Mesh, Metropolitan, Parallax, Parcel, Quotable, Savon, Slate, Vapor Trial, View, Wood Type”. Each theme has different properties like headings colors, sizes, shadings, etc.
Reset to Theme from Template
This is one of the options given in the Themes dropdown. When you click on it, it will reset your document theme to the theme of the template being used. You need to select a template from the given templates when you start MS Word. Each template follows a theme and this option will reset the theme to the theme being used in that template.
Browse for Themes
When you click on this option given in the dropdown of Themes, you’ll be referred to the file explorer and here you can select a theme that you’ve downloaded.
Save current Theme
This option of the Themes dropdown allows you to save the current theme in your system. You can use it in any other document by clicking on the “browse for themes” options and then selecting that theme.
Style Set:
It is the second option available in the Document Formatting Section. It contains different styles that you can use according to your requirements. When you click on its dropdown. It has more sections which are:
This Document:
It contains the style which is selected for the current document.
Built-in:
These styles have many properties including different heading and paragraph sizes, colors, and more. It contains many built-in style sets. These themes are “Basic (Elegant), Basic (Simple), Basic (Stylish), Black & White (Capitalized), Black & White (Classic), Black & White (Numbered), Black & White (Word 2013), Casual, Centered, Lines (Distinctive), Lines (Simple), Lines (Stylish), Minimalist, Shaded, Word, Word 2003, Word 2010, Word 2013”.
Reset to the Default Style Set
This option is similar to the option of themes “Reset to Theme from Template”. That option is used to reset the default theme of the template while this one is used to reset to the default style set.
Save as a New Style Set
This option is also similar to the option of themes “Save current theme”. This option is used to save the current theme to use in other Word files in the future.
Colors:
Colors play a vital role in each document. Each document follows a specific color set. Colors can also be selected or customized using this option of the design tab in MS Word. It has many default color sets which are “Office, Office 2007 – 2010, Grayscale, Blue Warm, Blue, Blue II, Blue Green, Green, Green Yellow, Yellow, Yellow Orange, Orange, Orange Red, Red Orange, Red, Red Violet, Violet, Violet II, Medium, Paper, Marquee, Slipstream, Aspect”. At the last of this dropdown, another option is “Customize Colors”, explained below:
Customize Colors:
It is another option of the Colors dropdown used to add another color set. When you click on this option, a popup appears called “Create New Theme Colors” and is explained below:
Create New Theme Colors:
It has many options that help to create a new theme color set. We have divided this popup into some parts: Theme colors: There is a color box in front of each list member, click on the color dropdown to customize. It has these members:
- Text/Background – Dark 1
- Text/Background – Light 1
- Text/Background – Dark 2
- Text/Background – Light 2
- Accent 1
- Accent 2
- Accent 3
- Accent 4
- Accent 5
- Accent 6
- Hyperlink
- Followed Hyperlink
Sample:
It is the preview of your color selections. You can keep an eye on it and keep customizing the colors at the same time.
Name:
Write a name for it. Next time when you will click on the ‘Colors dropdown’, You will see this color set also with the name you made it.
Reset:
It resets your color selection.
Save:
It saves your color selections. You can see it next time in the colors dropdown if and only if you have saved it.
Cancel:
You can cancel it and close this popup at any time. But remember this will not be saved.
Fonts:
Fonts are very important in any document. The Drop-down of the ‘Fonts’ has many fonts already which are wonderful. Still, you have the option to create a new theme set by clicking on “Customize Fonts” and a popup named “Create New Theme Fonts” will appear. Select the fonts you want to use and click on save. The fonts which are already available are given below:

Paragraph Spacing:
Style Set:
It contains the style set you’re using currently.
Default
It has the following properties:
- Before: 0 pt
- After: 8 pt
- Line Spacing: 1.08
Built-In
It contains the paragraph spacing set already available in the Design Tab in MS Word.
No Paragraph Space
It has the following properties:
- Before: 0 pt
- After: 8 pt
- Line Spacing: 1
Compact
It has the following properties:
- Before: 0 pt
- After: 4 pt
- Line Spacing: 1
Tight
It has the following properties:
- Before: 0 pt
- After 6 pt
- Line Spacing: 1.15
Open
It has the following properties:
- Before: 0 pt
- After: 10 pt
- Line Spacing: 1.15
Relaxed
It has the following properties:
- Before: 0 pt
- After 6 pt
- Line Spacing: 1.5
Double
It has the following properties:
- Before: 0 pt
- After: 8 pt
- Line Spacing: 2
Custom Paragraph Space
A popup named ‘Manage Styles’ appears which has many options that you can use to define your custom paragraph space and use it. The ‘Manage Styles’ popup contains many options to create a new paragraph spacing style.
Effects:
When you insert shapes, they have default color and style. Then you edit them in the ‘shape format’ tab. But you can change it in the Effects option of the Design Tab in MS Word. The effects that it already has are “Office, Office 2007 – 2010, Subtle Solids, Banded Edge, Smoky Glass, Glow Edge, Grunge Texture, Frosted Glass, Top-shadow, Inset, Milk Glass, Riblet, Reflection, Extreme Shadow, Glossy”. Want to learn How to insert shapes and more? Read our article ‘Word Tutorial: Exploring the Insert Tab‘.
Set as Default
You can click on the ‘Set as default’ option so that when you open MS Word next time, you won’t need to apply any formatting. You can do some formatting like font size, color, theme, font, etc., and the next time when you open a new Word document, this formatting will be done already.
Watermark
You see watermarks in most of the documents but you don’t know to insert and format it. Don’t worry it’s explained here! When you click on the drop-down of Watermark. You see many watermarks already given divided into 3 categories:
- Confidential
- Disclaimers
- Urgent
And then there are some options which are:
- More Watermarks from Office.com
- Custom Watermarks
- Remove Watermarks
- Save Selection to Watermark Gallery
Custom Watermark
Click on the ‘Custom Watermark’ option, and a popup named ‘Printed Watermark’ will appear. It contains the following sections:
- No watermark
- Picture watermark
- Select Picture, Scale
- Text watermark
- Language
- Text
- Font
- Size
- Color
- Semitransparent
- Layout: Diagonal/Horizontal
WordArt Tab (To edit Watermark):
Want to edit the Watermark you inserted recently? It’s possible! You need to follow these steps:
- Open the Header & Footer by clicking two times on the place of the header.
- Header & Footer Tab will appear.
- Before the Header & Footer Tab, another Tab will also appear named ‘WordArt’
- Click on the ‘WordArt’ tab to open it.
The WordArt Tab contains many options to format your Watermark. As Watermark appears with the help of WordArt. WordArt contains many designs and artistic effects and these all are available under this tab. This tab contains the following sections:
Text
- Edit Text
- Spacing
- Even Height
- Vertical Text
- Alignment
WordArt Styles
- Shape Fill
- Shape Outline
- Change Shape
Shadow Effects
- Shadow Effects
- Nudge Shadow
- On/off shadow
3-D Effects
- 3-D Effects
- Tilt Effects
- On/Off Effect
- 3-D Effects
Arrange
- Position
- Wrap Text
- Bring Forward
- Send Backward
- Selection Pane
- Align
- Group
- Rotate
Size
- Height
- Width
Page Color
Use this option if you want to add page color. The dropdown of Format Background has a last option which is ‘Page Color’. When you click on the page color dropdown following options appear:
- Theme colors and Shades: The first row, contains the colors that are in the theme you’re using and then it has shades of each theme color.
- Standard Colors: There is a row of standard or basic colors.
- No Color: If you want to remove the background you can click on this option.
- Recent: Some recently used colors will be also present.
- More Colors: Click on more colors, if you want to add any other. When you click on this option, a pop-up will appear which is:
- Fill Effects: This pop-up has these tabs and options:
- Gradient: You can select two or three preset color sets. You can increase or decrease transparency and select Shading Styles which are Horizontal, Vertical, Diagonal Up, Diagonal Down, From Corner, and From Center.
- Texture: You will see some textures that are already there and can be downloaded more by going online.
- Pattern: When you click on this option, many patterns appear. You can select any pattern from these available patterns. You can change the color and background according to your needs.
- Picture: You can select any picture from your file explorer when you’re offline and can search online when you’re online. The picture which you will select be made the background image of your page.
- Fill Effects: This pop-up has these tabs and options:
Page Border:
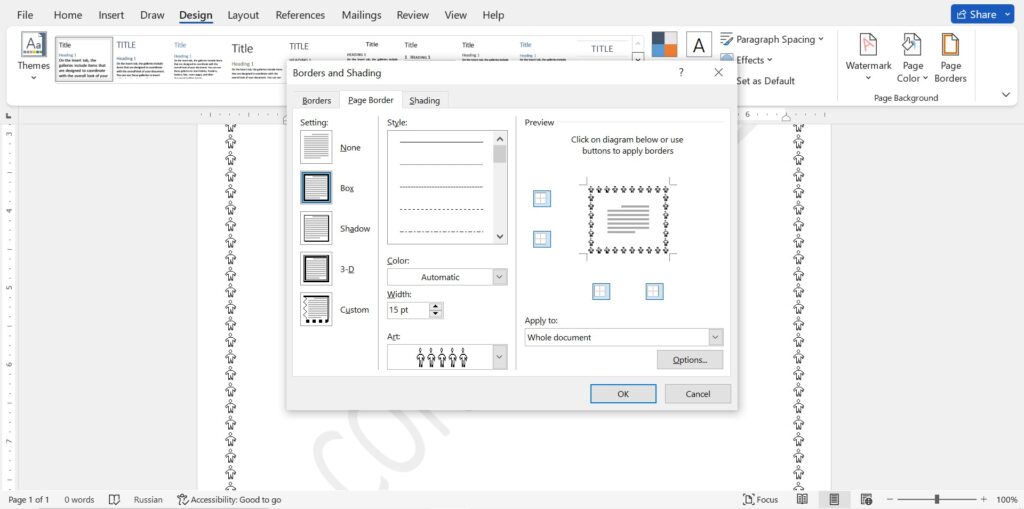
The next option which is available in the Page Background Section is Page Border. Click on it and a popup appears named ‘Borders and Shading’. We have divided it into some parts which are:
Borders:
Setting
- None
- Box
- Shadow
- 3-D
- Custom
Style
- Lines
- Single
- Double
- Dotted
- Bold
- etc.
Color
- You can select any color from the given colors.
Width
- Width ranges from 1/4 pt to 6 pt.
Art
- It has many designs available.
Page Border:
Setting
- None
- Box
- Shadow
- 3-D
- Custom
Style
- Lines
- Single
- Double
- Dotted
- Bold
- And many more styles.
Color
- You can select any color.
Width
- It ranges from 1/4 pt to 6pt.
Preview
- Preview
- Borders
Apply to
- Whole document
- This section
- This section – First Page Only
- This section – All except the first page
Options
When you click on this button, another popup appears named ‘Border and Shading Options’ in which options are like margins from top, bottom, left, and right.
Shading:
Fill
- Here you can select a color for shading.
Patterns
- Style
- Color
Preview
- Shows the preview of the page on which you applied formatting of Borders and Shading.
Apply to
- Here you can select where you want to apply this ‘Borders and Shading’ formatting.
Final Words:
To conclude, the Design Tab in MS Word contains many options to format themes, styles, colors, fonts, watermarks, page colors page borders, etc. These all are important in any document. We have explained the methods that how you can do these formatting. Now, it’s time to practice it. To facilitate you, here is some homework for you and the hint is also given in it. Make a document like given below and share it with us in the comments:

Do all these formatting and make a document. Don’t forget to tell us in the comments whether was it helpful to you or not. If you have any questions or faced any difficulties. Let us know, we will help you.


Pingback: Layout Tab in MS Word - Mntorz
Pingback: References in MS Word - Mntorz