Introduction:
Do you want to be pro of insertion and editing the pictures, shapes, tables, pages, header, footer, word art, equations, and many more? I promise that you’ll be able to do it efficiently after reading this step-by-step guide. You could show your creativity by using features available in Insert Tab.
Insert Tab contains many options which you can use to insert different elements in your document. In this article, we are going to explain completely that how you can insert different elements? Moreover, we don’t have relied on it. We have explained the complete procedure to edit these elements.
When you create a table or insert picture or shape or equation, a new tab appears on the menu bar. We have explained these also. You could use them to insert and edit these elements efficiently after reading this step-by-step guide completely. So, let’s get started!
Have you read these? ‘Getting Started with MS Word‘ and ‘Word Tutorial: Interface and Home Tab‘
Sections on Insert Tab:
There are sections made on Insert tab ribbon. Each section contains different options. Sections and their all options which it have, are explained below:

Pages
As its name suggests, it is about pages. It helps you in working with pages. A document can have hundreds and thousands of pages, and you may need to edit that document by inserting some extra pages or something else. It has these options:
Cover Page
As its name suggests, it is about cover page of your document. When you will click on the cover page drop-down menu, you will see some cover pages such as slice etc. You can also go online to search more. These are pre-designed templates that are completely editable to make your document first page (cover page) eye-catching and interesting.
Blank Page
Use this option to insert one more blank page to your document. It will insert a single page after the page on which cursor is present at that time. You don’t need to press ‘Enter’ button many time and then the text after the sentence will be moved to the next page.
Page Break
Suppose you’re writing some paragraphs in MS Word, you want to write the next paragraph on the next page, then you can use ‘Page Break’ option to do this just in one click. You don’t need to press ‘Enter’ button many time and then the text after the sentence will be moved to the next page. Thus, time saving.
Tables
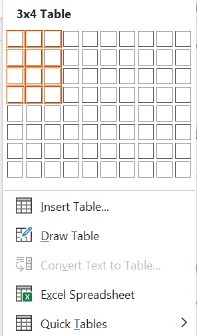
Tables are very important in the Insert Tab. You see tables almost in every document. They have rows and columns, each intersection of row and column is called cell. They are used to show information or comparison etc. Tables help us in analyzing data as it is easy to read and is appeared in an organized and structured way. Now, the question is, how to create tables? There are three main methods to insert table. When you will click on Table’s drop down, these options will appear:

Table Canvas
You can select maximum 10 rows and 8 columns with mouse or touch pad. Just move your cursor on it, where you have completed your selection of rows and columns, click right there. Table will appear with the number of rows and columns you selected.
Insert table
The second option is to click on ‘Insert Table’ option given in Table dropdown. When you click on it, a popup will appear. Here you have to enter the number of rows and columns and click on ‘Ok’, that’s it, table created!
Draw Table
When you click on ‘Draw Table’, your cursor will change itself to a pencil, use it to draw rows and columns in an existing or make a new table. If you have an existing you can use this option to increase the number of columns, sub-columns, rows, and sub-rows. Also, you can change the line color, design etc. which is discussed in Design Tab, so, keep reading!
Convert Text to Table
Suppose you have been given some names of students, their classes and their ages. Each is separated from one another with a ‘tab’ space. You can select that text and then click on ‘Convert Text to Table’, from dropdown of Table. That text will be converted to table immediately.
Excel Spreadsheet
In the Table dropdown, there is another option called ‘Excel Spreadsheet’. When you click on it, it embeds a complete excel worksheet in that Microsoft Word Document.
Quick Table
Quick table contains pre-designed tables which you can use when needed. They include calendars and some more tables. You don’t need to spend your time in making and editing such tables, as these are already available and you can use and customize them easily.
Edit Tables:
When you create a table, it doesn’t seem great. It looks too basic and rough. To give it a look, you need to edit it. When you click on table, you will see two extra tabs are appeared on menu bar. These are used to edit tables. They have number of options you can use according to your need. These tabs are explained here:
Table Design Tab:
It is the first tab which appear and provide you options to select design of your table.

Style Options:
- Header Row
- Total Row, Banded Row, First Column, Last Column, Banded Columns
Table Styles:
- Contains different pre-designed styles that you can use.
Borders:
- Border Styles
- Pen color
- Borders
- Border Painter
Layout Tab:
It is the second tab which appears when you select a table. It provides you the options that you can use to edit the table completely.

Table:
- Select
- View Gridlines
- Properties
Draw:
- Draw Table
- Eraser
Rows and Columns:
- Delete
- Insert Above, Below, Left, Right
Merge:
- Merge Cells
- Split Cells
- Split Table
Cell Size:
- Height
- Width
- AutoFit
Alignment:
- Positions
- Test Directions
- Cell Margins
Data:
- Sort
- Repeat Header Rows
- Convert to Text, Formula
Illustrations
It is all about graphics you insert in your document. Illustrations make the document more professional, readable and beautiful. The Illustrations section contains the following options:
Pictures
You can add any picture that you want to use in the document. There are three options present there and are explained here:
This Device
If you want to work offline, you can click on it. It will bring you to the file explorer. Now you have to select a picture you want to insert in the document.
Stock Images
Stock images mans paid content, if you want to use such images you can use them also in Insert tab.
Online Pictures
You can search for online pictures, for this you need to give a URL of that picture, once you give a URL, the picture with that URL is selected and inserted in the document.
Shapes
Shapes are very important in MS Word. Add them when you’re on insert tab. You can make different creative designs using different shapes. When you click on the Shapes drop down you will see these sections:
- Recently Used Shapes
- Lines, Rectangles
- Basic Shapes
- Block Arrows
- Equation Shapes
- Flowchart
- Stars and Banners
- Callouts
Edit Shapes:
When you insert any shape, then select it, now you have to edit it. For this, on the menu bar, you can see a new tab. It is called Shape format.
Shape Format Tab:
When you insert a Shape or a Word Art, another tab appears on the menu bar which is: ‘Shape Format’. It contains many options to edit the shape and Word Art. Word Art is discussed in upcoming paragraphs, but here we’re discussing shape format.

Insert Shapes:
- Shapes
- Edit Shapes
- Change Shape
- Edit Points
Shape Styles:
- Themes
- Shape Fill
- No Fill
- solid fill
- picture fill
- gradient fill
- texture
- more textures
- patterns
- Shape Outline
- Shape Effects
WordArt Styles:
It is about styles of WordArt and is discussed in upcoming paragraphs.
Text:
- Text Direction
- Align Text
- Create Link
Accessibility:
- Alt Text
Arrange:
- Position
- Wrap text
- Bring Forward
- Send Backward
- Selection Pane
- Align
- Group Objects
- Rotate
Size:
- Height
- width
Icons
Used to visually communicate using symbols. You can also add icons in your document. Whether you want to insert image via working online or offline or access stock icons, you can use simply by clicking on the relative option in the pop up menu.
3D Models
Insert a 3D model so that you can rotate it and see all angles. 3D models can also be inserted in document by simply clicking on this option and then following the prompts.
SmartArt
Insert SmartArt graphic to visually communicate information. Insert any of SmartArt graphics in your document by simply selecting a template and editing and adding your own information. You will see following SmartArt graphics:
- All
- List
- Process
- Cycle
- Hierarchy
- Relation
- Matrix
- Pyramid
- Picture
- Office.com
Chart
Make it easy to spot patterns and trends in your data by inserting charts. You can use any of these charts in your document:
- Recent
- Templates
- Column
- Line
- Pie
- X Y (scatter)
- Map
- Stock
- Surface
- Radar
- Tree map
- Sunburst
- Histogram
- Box & whisker
- Waterfall
- Funnel
- Combo
Screenshot
Quickly add a snapshot of any window that’s open on your desktop to your document.
Media
You can include media in the document , it has only on option, which is :
Online Videos
Use this option to insert videos within your document. If you’ll be offline, it will tell you to whether you want to work offline or try again. If you select ‘work offline’, you’ll be directed to file explorer, and you can select any video.
Links
Links also play a vital role in word documents. You can link different things to other. It contains the following options:
Link
It is used to add link. When you click on link, you have to add the ‘URL’. You can add link of an existing web page or file or place within this document or create new document or email address. You can write the text to display and select the document you want to link with this one. After selecting whenever you open this document, click ‘Ctrl + =’, the document with which this one was linked will be opened.
Bookmark
To describe it, we want to tell you an example. You’re reading from a document of 1000 pages, now you think “I’ll continue reading it tomorrow!”, you close the document. On the next day, you opened that document, you forgot the page number where you were yesterday. It can be a great worry for you. To prevent from these situations, you must use ‘Bookmark’ option which will help you always. You can add bookmarks in your documents simply by clicking on this option.
Cross-reference
It refers to specific parts of your document such as tables or figures or headings etc.
Comments
Comment section has only one option, which is:
Insert Comment
You ma need to insert comments about the document parts where you’re now. You may help others to understand what it is about or add notes.
Header & Footer
It is also a very important element. You may have seen Header & Footer in all of your books and most of documents. Header is the content which you need to enter once and it will appear at the head of the page automatically when you insert a new pages, and footer will be at bottom of the page. The formatting of header or footer you do on single page is applied on all of the pages.
Header
To insert header, just click on drop down of header option. Now, browse a header and select one. Whether you want to work online or offline you can do it. If you are offline then select from already available header designs and if you want to get an online header click on ‘More Headers from Office,com’, and you can add that also. Header inserted!
Footer
To insert footer, just click on drop down of footer option. Now, browse a footer and select one. Whether you want to work online or offline you can do it. If you are offline then select from already available footer designs and if you want to get an online footer click on ‘More Footers from Office,com’, and you can add that also. Footer inserted!
Edit Header & Footer
When you’ve inserted a header & footer, now this time is to edit it, you can edit it completely according to your needs. In this tab, you will see sections as there were on other tabs. These sections are explained below:

- Header & Footer
- Header
- Footer
- Page Number
- Insert
- Date & Time
- Document Info
- Quick Parts
- Pictures
- Online Pictures
- Navigation
- Go to Header
- Go to Footer
- Previous
- Next
- Link to Previous
- Options
- Different First Page
- Different Odd & Even Pages
- Show Document Text
- Position
- Header from Top
- Footer from Bottom
- Insert Alignment Tab
- Close
Page Number
You can insert page number at any position of page of document by using it. Its dropdown has these options:
- Top of Page
- Bottom of Page
- Page Margins
- Current Position
- Format Page Number
- Remove Page Numbers
Text
This section has some options which help in inserting text in word documents. Following is the explanation of the options available in the Text section:
Text Box
Text Box is the drop down which contains some text boxes which are pre-designed and fully customizable. Also, it has more options which you can use to draw a text box or go online to download any other from ‘Office.com’.
Quick Parts
Insert preformatted text, auto-text document properties and fields anywhere in the document. It contains following options in its dropdown:
- Auto Text
- Document Property
- Field
- Building Block Organizer
WordArt
Add some artistic flair to your document using a WordArt text box. You have variety of WordArt templates which you can use and edit according to your need. When you insert it, now you can edit it and make it more artistic and eye-catching.
Add Drop Cap
Create a large capital letter at the beginning of a paragraph. You could have seen in many of books, the chapter’s first paragraph was being started with a large capital letter. You can also do it by using this option.
Signature Line
Insert signature line that specifies the individual who must sign.
Add Date and Time
Quickly add the current date or time. There are number of formats available in Microsoft. You can use any of them according to your need. Also, an interesting thing is, you can use update date and time automatically option, it will keep changing date and time automatically.
Object
Insert an embedded object, such as another Word document or an Excel chart.
Symbols
Symbols is also a most important and useful section of Insert Tab. Before describing it, we want you to have a look on your keyboard and see the symbols that are present on it. Now, think of you have to insert a quadratic or integral or differential equation in document. Can you? No, it can’t be done without using this section of insert tab that provides you a complete library of all the symbols and equations used in mathematics. Morale high? We are going to describe it in more detail. So, keep reading it with even more curiousity.
Equation
Add common mathematical equations to your document, such as the area of a circle or the quadratic formula.
You can also build your own equations using the library of math symbols and structures.
Symbol
Add symbols that are not on your keyboard.
Choose from a variety of options including mathematical, currency, and copyright symbols.
Edit Equation:
When you insert an equation, another tab appears in the menu bar. It is called Equation Tab. It contains the some sections which are explained below:

- Tools
- Equation
- Ink Equation
- Coversions
- Unicode
- LaTeX
- Text
- ex Convert
- Symbols, Structures
- Fraction
- Script
- Radical
- Integral
- Large Operator
- Bracket
- Function
- Accent
- Limit and Log
- Operator
- Matrix
In a Nutshell:
To conclude, Insert Tab is very important and useful in Microsoft Word Document. You can insert tables, images, shapes, graphs, charts, videos, equations etc. in your document and can edit them with extra tabs which appear when you insert these elements. We have explained all these tabs like: Table Design and Layout Tab for Table, Shape Format for Shapes and WordArt, Picture Format for Pictures etc. We have explained the complete procedures. Let’s know that was this blog helpful for you? We hope that it was helpful, as it added to your information if you were new to Microsoft Word, or if even you have been using Microsoft, it has revised many things, let’s know are you going to start inserting and editing elements in your documents or we missed anything?


