Introduction:
Microsoft Word is used to format text documents. It has tabs including ‘Home‘, ‘Insert‘, ‘Draw‘, ‘Design‘, and ‘Layout‘. All these tabs have options for different kinds of formatting. The layout tab in MS Word has options that allow users to decide on page margins, orientation, page size, columns, paragraph indentation, spacing, and many more. It also has options to align and arrange visuals that you add to your document. The interesting thing is, you can do these settings once and set it as default. Next time, when you open MS Word, you won’t need to do these settings again. This helps save time when you usually make the same types of documents.
This article will explain how to use the Layout tab in MS Word. This article discusses all options of different sections in detail. Furthermore, in the end, you will also find a practice question to practice what you learned from here. Let’s start exploring the Layout Tab!
Layout Tab in MS Word
Do you know? Layout matters a lot in every document. The Layout Tab in MS Word is here to facilitate you. It helps you perform different page layout-related tasks quickly and easily. When you click on the ‘Layout’ tab, the Layout ribbon will appear, as given below:

Page Setup section of Layout Tab in MS Word
This section of the Layout Tab in MS Word contains all options that can be used to customize page setup. Your document can have several pages. When printing or sharing them with clients, colleagues, and supervisors via email or social media, you must check the page setup as before. You must look at whether it’s according to the requirements of the document or not. Many options in this section can be used to format the page. The ‘Page Setup’ section is given below:

Margins
Margins are the blank spaces on the page at positions: Top, Bottom, Left, and Right. You can format page margins easily by using the Page Setup of Layout Tab. You can increase or decrease margins on any side. Moreover, when you apply margin settings to a single page, they affect all pages in the document. Click on its dropdown to view its types, explained below:
Types of Margins
The ‘Margins’ dropdown lists the types of Page Margins below, along with their properties.
Last Custom Setting
Top: 0.5”, Bottom: 0.5”, Left: 0.3”, and Right: 0.5”
Normal
Top: 1”, Bottom: 1”, Left: 1”, and Right: 1”
Narrow
Top: 0.5”, Bottom: 0.5”, Left: 0.5”, and Right: 0.5”
Moderate
Top: 1”, Bottom: 1”, Left: 0.75”, and Right: 0.75”
Wide
Top: 1”, Bottom: 1”, Left: 2”, and Right: 2”
Mirrored
Top: 1”, Bottom: 1”, Inside: 1.25”, and Outside: 1”
Office 2003 Default
Top: 1”, Bottom: 1”, Left: 1.25”, and Right: 1.25”
Custom Margins
It is the last option available on the dropdown of Margins. When you click on it, a dialog box is opened. The ‘Margins’ menu, present in that dialog box, is selected in advance. Here, you have options to define your custom margins and these will be present as the first option next time that you have used these custom margins.
Orientation dropdown of Layout Tab in MS Word
Orientation is the Page’s Horizontal and Vertical Length Ratio. You need to use different types of orientation for different types of documents. To change the orientation, click on the ‘Orientation’ dropdown and select the one that suits your document. The types of Orientation are:
Portrait
In Portrait Orientation, the Horizontal length is small, and the Vertical length is large. In other words, the width of the page is less and the height is much more. Moreover, it is the standard orientation. Most of the documents need Portrait Orientation.
Landscape
The Landscape Orientation is the one in which the Vertical length is small and the Horizontal length is large. That is to say height of the page is less and the width is much more. For example, it can be used when you have a table that has a small height but width is big.
Size dropdown of Layout Tab in MS Word
The physical dimensions of the printed page are called its size. Different types of documents require different type of page sizes. For example, newspaper page size varies the most from commonly used pages in offices. So the size must be according to the need.
Sizes
The ‘Size’ dropdown offers various types of page sizes, listed below with their respective lengths and widths.
Letter: 8.5” x 11”
Tabloid: 11” x 17”
Legal: 8.5” x 14”
Statement: 5.5” x 8.5”
Executive: 7.25” x 10.5”
A3: 11.69” x 16.54”
A4: 8.27” x 11.69”
A5: 5.83” x 8.27”
B4 (JIS): 10.12” x 14.33”
B5 (JIS): 7.17” x 10.12”
Which size to use?
Some important page sizes and their related use are listed here:
- Business documents are usually in Legal or Letter page size.
- Academic Papers are mostly printed in A4 page size.
- The size of Brochures is A3 and sometimes A4.
- Posters require Tabloid page size.
More Paper Sizes
It is the last option present in the ‘Size’ dropdown. When you click on it, a dialog box appears in which the ‘Paper’ menu is opened in advance. It contains options so that you may define a custom page size according to your document requirements. This dialog box shows a preview. At the bottom left corner, you will find a button named ‘Set as Default.’ After selecting a page size or defining a custom size, click on it to set the size for future Word documents.
Columns dropdown of Layout Tab in MS Word
Your document can have only one column or multiple columns. Columns split the paragraphs on all pages you select. When you open a new document, it has one column. But you can change it to more and increase or decrease the width of the columns. When you click on the dropdown of ‘Columns’, the preset types of columns will be shown, which are:
Types
- One
- Two
- Three
- Left
- Right
More Columns
At the end of the types of preset columns, the last option is ‘More Columns’. When you click on it, a dialog box will appear. Here, you have options to choose one from the presets or define your own. You can increase or decrease the width of any column.
Breaks
Breaks are used to add breaks on the page at different sections of documents. If you are in the middle of your document and before and after are the text, and you want to end the text in this location you can use the page break option.
Page Breaks
- Page
- Column
- Text Wrapping
Section Breaks
- Next Page
- Continuous
- Even Page
Line Numbers
You can also add or remove line numbers to your document. Remember that this option differs from the bullets (numbered list), that is another thing. In bullets, a new bullet appears when you end a paragraph, while, line numbers are added to each line, not each paragraph. When you want to see quickly the number of lines of your document or want to know which line of document you are at this time, you can use this option. Moreover, you can customize line numbers. When you click on ‘Line Numbers’ dropdown, the types of line numbers appear:
Types
None: No line numbers are added. The ‘None’ is selected in advance.
Continuous: It means continuous line numbers. Each line will have a line number. The line number will continue to the next pages also.
Restart Each Page: When you select it, the line number starts again for the next page. For instance, if the end of line number on the first page is 25, then, the first line number on the next page will again start from 1, not 26.
Restart Each Section: With this option, the line numbering starts for each new section. A section may contain multiple columns and objects. To make a section, use the page break options.
Suppress for Current Paragraph: It is used to remove line numbering for the current paragraph. The line numbering will not be added to the current paragraph and will continue in for next paragraph.
Line Numbering Options: It is the last option of the ‘Line Numbers’ dropdown. Click on it and a dialog box will appear.
Line Numbering Options
In this dialog box, you can customize line numbering more. Also, you can set it as default.
Hyphenation
While typing in Word documents, you might notice that when a word runs out of space on a line, it moves to the next line. However, when this tool is active, Word splits the word and automatically includes a hyphen (‘-‘). Hyphenation is the tool with which you can save space.
Types
None: It is selected in advance and means that no hyphenation will be there in your document.
Automatic: It automatically hyphenates the words.
Manual: Furthermore, when you click on this option, a dialog box appears and it gives you a manual option to hyphenate the words. You can add a hyphen at the position of the word of your choice.
Hyphenation Options: When you click on it, you have more options to hyphenate words.
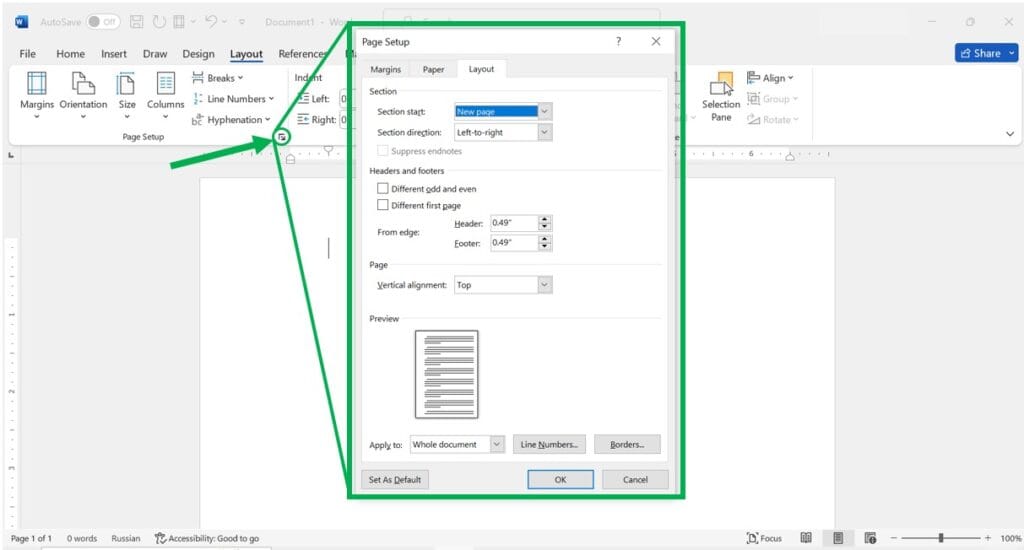
Launching Dialog Box of Page Setup:
On each section, there is a dialog box launcher arrow. It is in the bottom right corner. Click on it and the dialog box of that section will appear as shown in the picture:
Paragraph section of Layout Tab in MS Word
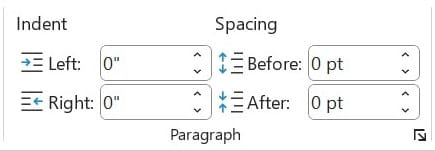
Your document can have many paragraphs. You can increase indent or space between them quickly by using this section of the Layout Tab in MS Word.
Indent
Indent means the blank space left before and after a paragraph. Here, you can increase or decrease the indent by using these options:
Left: Use it to increase or decrease the indent at the left of the selected paragraph(s).
Right: Use it to increase or decrease the indent at the right of selected paragraph(s).
Spacing
The blank space between two paragraphs is called ‘Spacing’. You can increase or decrease it when needed.
Before: Use this option to increase or decrease the spacing before the paragraph.
After: Use this option to increase or decrease the spacing after the paragraph.
Arrange section of Layout Tab in MS Word
The last section of the ‘Layout’ tab is ‘Arrange’. It is used in the arrangement of various objects you insert in your document. Remember that you can’t use these options when you have not selected an object such as a picture. Select a picture to access these options, which allow you to arrange it quickly and easily. These options are explained below.

Position
You can select a position where the selected picture will be on the page. When you click on its dropdown, you can select one which is suitable for your document. The following are the options that it has:
- In Line with Text
- With Text Wrapping
- More Layout Options
Wrap Text
- In Line with Text
- Square
- Tight
- Through
- Top and Bottom
- Behind text
- In Front of Text
- Edit Wrap Points
- Move with Text
- Fix Position on Page
- More Layout Options
- Set as Default Layout
Bring Forward
Use this option to bring objects such as pictures and shapes forward and it has these options:
- Bring Forward: Brings a step forward.
- Bring to Front: Brings in front of all objects except text.
- Bring in Front of Text: Brings in front of text.
Send Backward
Use this option to send objects such as pictures and shapes backward and it has these options:
- Send Backward: Sends a step backward.
- Send to Back: Sends in back of all objects except text.
- Send Behind Text: Sends behind text.
Selection Pane
When you click on this option, a sidebar opens where you can see all the objects your document has. It has the following options:
- Groups
- Pictures
- Hide/Show
Align
Click on the ‘Align’ option to reveal various alignment options, which help you align objects quickly in the document. It contains the following options:
- Align Left
- Align Center
- Align Right
- Align Top
- Align Middle
- Align Bottom
- Distribute Horizontally
- Distribute Vertically
- Align to Page
- Align to Margin
- Align Selected Objects
- Use Alignment Guides
- View Gridlines
- Grid Settings
Group
It is used to group or ungroup more than one object. You may need to move more than one picture so that their margin must remain the same, then you will need to use this option.
- Group: Click on it to group more than one objects.
- Ungroup: Click on it to ungroup the objects which were grouped.
Rotate
You can rotate an object quickly after selecting it and using the following options:
- Rotate Right 90o
- Rotate Left 90o
- Flip Vertical
- Flip Horizontal
- More Rotation Options
Final Words:
The layout tab in MS Word has many options allowing you to do various page-related, paragraph-related, and arrangement-related formatting easily and quickly. We have described all the options in each section in detail. Now it’s time to practice what you have learned. See the following picture thoroughly.
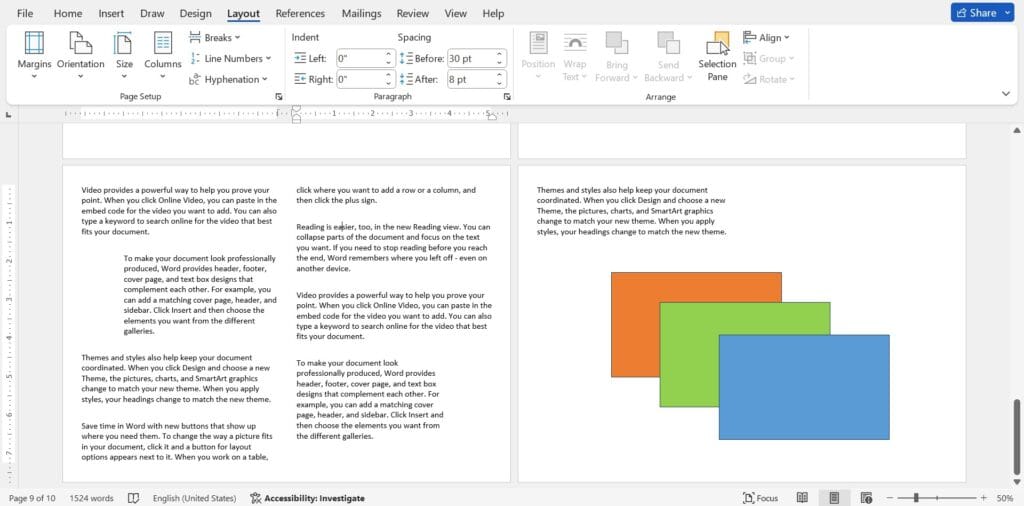
How to make? Do these one by one!
- Copy some paragraphs from anywhere.
- Make two columns of text.
- Increase the left indent of a paragraph and increase the right indent of another paragraph.
- Increase the spacing between paragraphs.
- Insert three rectangles and change their colors as in the picture.
- Now bring the Orange rectangle to the front.
- Send the Green rectangle backward.
- Move the Blue rectangle behind text.
Moreover, this picture has hints also. We encourage you to make this document as soon as possible. Don’t forget to tell us in the comments whether this article was helpful or not in understanding Layout Tab in MS Word.
