Introduction:
Microsoft Word is a tool that is used to format text documents. It has different tabs: Home, Insert, Draw, Design, Layout, References, Review, and View. The View Tab in MS Word focuses on how users interact with and view their documents. In this article, we cover the View Tab in detail. We will explain all the options available in each section of this tab. You’d never seen such a detailed guide with examples. Let’s start exploring it!
View Tab in MS Word:

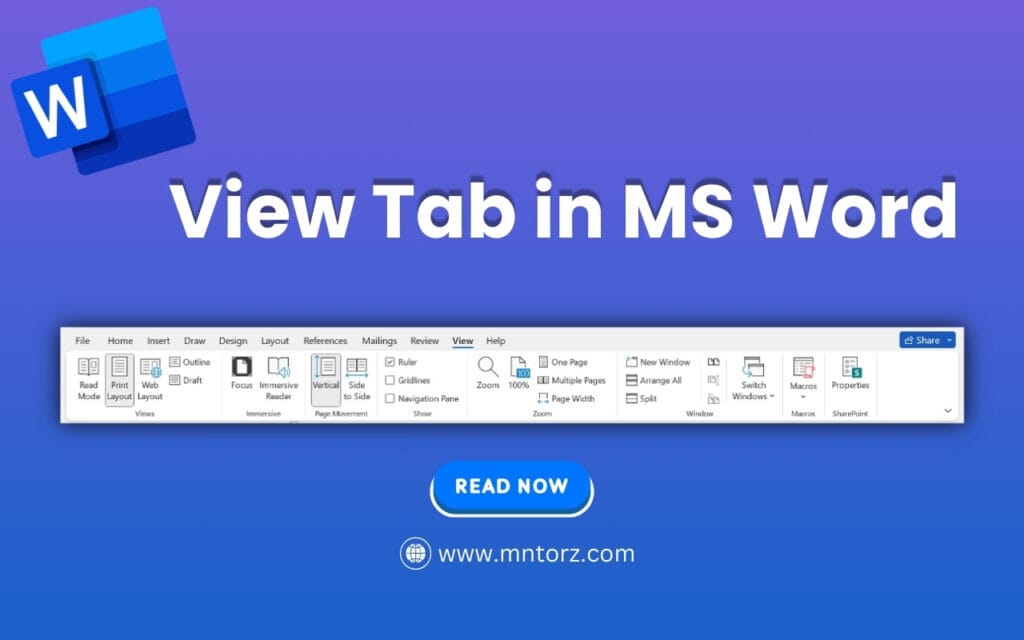
The View tab in MS Word is the second-to-last tab on the tab toolbar from the right side. It has eight sections, and each has various options. Each section and its respective options are explained in detail below:
Views
You may have a book with many pages in a Word document format. Reading it completely can take hours. You must take breaks to take care of your eyes. With that, keeping focus on the book is also important. Microsoft Word has the solution for you. You can use different views for different types of documents. Each view has a specific purpose and properties, and you can switch between them easily with the View tab in MS Word. The views available in MS Word are:
Read Mode
You sometimes don’t need to write or format the document, so you don’t need to see options for these tasks. But you need only the options that help you increase the readability. Read Mode View is here to help you in this situation.
To enable the Read Mode, navigate through the menu bar and then select the ‘View tab.’ Now, click on ‘Read Mode’ in the Views section. As you click on it, all the toolbars and ribbons will disappear, and a simple layout will open. In this layout, there is a toolbar that is situated at the top and has three tabs named File, Tools, and View. Here is what they have:
File Tab:
As you click on the File tab, it will open the File page, and here you have options to open a new document, save as, and more options.
Tools Tab:
The Tools tab has the following options:
- Find: Search anything within the document.
- Search: Click on it, and a sidebar will be opened, and you can search across the web.
- Translate: You can translate your document into any other language.
- Undo Typing: It undoes the last single action you performed.
- Redo Typing: It redoes what you undid last time.
View Tab:
The View tab has the following options:
- Edit Document opens the print layout view, the default for new documents.
- Focus view hides options and the taskbar to minimize distractions.
- Navigation Pane opens a sidebar with the document outline, letting you jump to headings/subheadings.
- Show Comments displays comments in the document.
- Column Width has three options:
- Narrow: shows two pages side-by-side in portrait mode.
- Default: matches the page orientation set in the Layout tab.
- Wide: automatically selected in Reading Mode; also accessible after switching reading modes.
- Page Color changes the page color for reading, without affecting printing or exiting reading mode.
- Layout in Reading Mode differs from the Layout tab and has:
- Column: scroll horizontally between pages.
- Page: scroll vertically between pages.
- Syllables add breaks to words to aid reading.
- Text Spacing increases the spacing between letters.
- Read Aloud uses Microsoft’s built-in reader to read documents offline.
Print Layout
When you open a new document, Print Layout is enabled as the default. It shows how your page will be when printed. When you are in Print Layout, all toolbars, tabs, and ribbons are present, and you can use them easily.
Web Layout
It shows how your document will look when used as a webpage. For example, if you’re writing content for your website, you can simply enable the web layout, and you will see how this content will look on the webpage. Additionally, you can use this if you have wide tables. You would be able to see all the wide tables. The web layout doesn’t affect the print; it is used in display only. It hides the rulers and zoom of the page; the text will wrap to the previous line, and it auto-fits the content in it. It increases the page width. For example, a sentence of two lines will come on one line. But this width doesn’t affect the print; for this, you should check the print layout.
Outline
As you click on the outline option, a new tab named ‘outlining’ will appear on the tabs toolbar. Its ribbon contains the following sections:
Outline Tools:
If you want to hide the text formatting, you can uncheck the checkbox ‘show text formatting.’ If you make the ‘Show First Line Only’ option checked, you will see only the first line of all the paragraphs.
Show document:
Let us tell you an interesting thing. You can embed a document in another document, also. The embedded document will be named as a subdocument. When you click on this, it will show the options to manage the sub-document. As you click on this option, some more options will be added to this, and the create option is used to add a new document within your document. The other option, Insert, is used to add another document as a subdocument that already exists in your system. Also, you can use the other options that are to manage the embedded documents.
Draft
The draft view is used to show only the text in your document. Everything else, like pictures or tables, will disappear from the document. Furthermore, it will look like the web layout.
Immersive
The immersive section has two options, which are:
Focus
We can say ‘Focus’ is a view mode, as we discussed the Read Mode, Print Layout, and Web Layout. This is the most important, as it entirely changes the layout, and no option will appear. Your complete focus will be on your document. You can use shortcut keys and type in the document. But you don’t have menus and options as you see in the print layout. The taskbar will also disappear to help you focus only on the document. The focus option is available in the status toolbar, also. Your document will look like this:
Immersive Reader
Use this option of View Tab in MS Word to listen to the content that is present in your document.
Page Movement
There are multiple pages in a single document. Two options appear here:
Vertical: It is the default page movement. You can scroll to the next pages by using the mouse wheel or side ruler, or moving two fingers on the touchpad from bottom to top.
Side to Side: Enable it if you need a different page movement. Now, moving to other pages will work from left to right and right to left. It will let you feel like a book.
Show
It contains some checkboxes that you can check or uncheck according to what you want to see and what you don’t.
Ruler: It is the page height that is shown on the left side of the screen.
Gridlines: If you check this option, all the pages of the opened document will have gridlines on each page. They will help you align objects correctly. Objects can be pictures or tables.
Navigation Pane: As you click on this option, a sidebar will open that helps you navigate through the complete document, not only the current page. It will have all the headings included in it. You can click on any of the links, and you don’t need to scroll through the pages and find the desired part of the document. In this way, the cursor will be moved to the heading where you clicked on the navigation pane. You can consider this sidebar to be a table of contents, also.
Zoom
You can zoom the document to the level that is right for you. This section contains these options:
Zoom
It is used to zoom the page so that you may see the content on the page easily. It doesn’t have any effect when you print that page, but it is only to help you see the document with more focus, and you can remove the mistakes, and whether you have added tables or shapes and want to align them correctly, you may need to zoom in and then fix that.
100%
This is the zoom you mostly see and is good to use. Most people work with it as it suits them.
One Page
The default zoom is one page. For example, if you zoom out the pages (e.g., 30%), they will be in a single column. On a single row, multiple pages will not come.
Multiple Pages
If you select this, as you zoom out the pages (e.g., 30%), multiple pages will come on a single row.
Pro Tip: Open MS Word and keep trying everything you are learning from here. For now, test the one-page and multiple-page options. After zooming out on the pages, you’ll have more understanding of it.
Page Width
As you click on this option, this option will fit the page width to the width of the window. The window is the width of your screen.
Window
This section of the View Tab in MS Word is used to manage the document with the window. It has multiple options, which are
New Window
Use this, and it will instantly open the document again. Your document, on which you were working, will be opened two times.
Arrange All
When you have at least two documents open, you can click on this option to see both windows at the same time. You can even see both documents at the same time by resizing both documents and then setting their width and height, but this option is best as it instantly arranges them, and you don’t need to resize them to fit the window.
Split
You can see the two sections of a document at the same time. For example, if you are putting data in a table that you have to extract from a specific section of your document, then you’ll be scrolling the document again and again to find the data. But if you click on this option, your document will be divided into two windows. You now have two documents, and you can scroll once to the desired section from where you were extracting the data, and in the other window, just start putting the data in the table without wasting time. Now you can scroll through the documents separately. After you have completed it, just click on this option, which is now replaced as ‘Remove Split,’ and it will bring your document back as it was previously (before splitting).
View Side by Side
As you click on this option, both documents will take the whole width of your window and auto-fit themselves. Both take the same width. But still, you can resize them. As you enable this option, the following two options will also be used.
Synchronous Scrolling
This is used to scroll both documents at the same time. There will be two documents, but both scroll like one. This is very beneficial when you need to compare two documents line by line.
Reset Window Position
If you have resized the windows, click on this option, and it will instantly bring you to the position where both documents fit the whole window size.
Switch Windows
You may have opened many Word documents at the same time. As you click on this drop-down, you’ll see all the documents there. Just click on the document that you want to open, and it will be opened instantly.
Macros
Macros is a list of actions you can work with. It’s a button with a dropdown. As you click on this button, a dialog box appears in which you have these buttons: Run, Step Info, Edit, Create, Delete, and Organizer. You can search for any macros. You need to select a macro to run it. As you run a macro, it will start performing the actions you have in this macro. The options in this dropdown are
- View Macros: As you click on this option in the dialog box, the same dialog box appears that appears as you click the button.
- Record Macro: Now, let us tell you how to record macros. You just need to click on the Macros drop-down menu, and it will start recording your actions.
- Pause Recording: Once you have started recording a macro, you can pause recording with this option anytime and then resume it again with this same option.
SharePoint
It contains all the details and properties of your document. As you click on this option, you are directed to a new page, which is the File Tab, and the menu named ‘Info’ will be opened in advance with just one click. Here you’ll find detailed information about your document. You can edit it and make it best for sharing. Here are the best practices you should consider before sharing the document:
- Use quick buttons, which include ‘Upload,’ ‘Share,’ ‘Copy Path,’ and ‘Open File Location.’
- Protect the document by adding limitations for the people on what they can do with this document.
- You can inspect the document so that you may easily fix the issues with the document.
- You can get auto recoveries with the manage document.
- On the right side, you’ll see all the properties. Here you will see the size, number of pages, words, and total editing time. You should add a title, tags, and comments, as it will show your document is professional and make it easy to find the document.
In a Nutshell
In conclusion, the View tab in MS Word contains various views to help you focus on the document. The other features, including page movement, zoom, and arranging windows, help to make the documents more readable and manageable while saving users’ time. And lastly, SharePoint has all the properties your document has. We would love to hear from you in the comments that this blog was helpful and informative for you.